As a continuation of the journey through old projects, we now arrive at my foray into WASM. At the time WASM was evolving beyond asm.js and becoming a proper standard with a formal specification and binary format. To learn more, I wanted to come up with a problem to solve with WASM. While other people had been doing far more practical things like getting existing C projects to run in the browser, I wanted to build something else, and I wanted to use Rust.
The problem was that I had no idea what to build. I knew I wanted to build something “I thought” would be a computationally complex task. While I am not good at it nor have I invested the hours to be good at it, I have a passing interest in cryptography. In the past, I had written simple cypher programs, including the Caesar and Playfair cyphers. This time, I decided it was time to up the game. I resolved to learn about the Enigma machine and produce a working version of it.
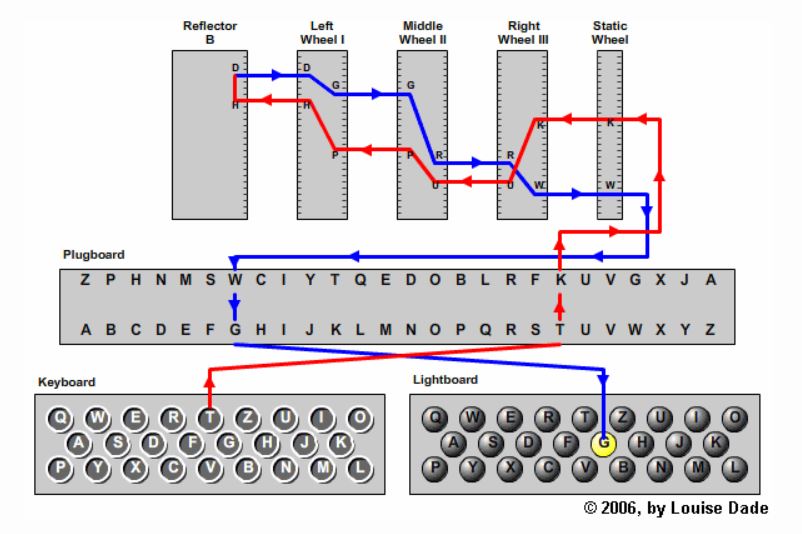
What is the Enigma machine?
While I assume this is a fairly well-known machine. However, I will attempt to provide a brief history of the machine while highlighting the relevant components. The Enigma was an electromechanical device used to encrypt messages. It is most commonly known for its use during WWII. During this time, the Germans used it to send encrypted communications. In a sense, you could think of it as an early version of modern TLS. This device is likely well known amongst software engineers due to its relationship to the Bombe and Alan Turing. If you are interested in a far better history of this device, I recommend watching this video.
History aside, the relevant components are of more interest for this article. The main input of this device was via a keyboard. This keyboard took mechanical actions, routed them through a series of electrical components, and lit up a bulb at the end to show the encrypted character. The first and most notable component used is the rotors. Each machine had three rotor slots and up to five different rotors. These rotors had one position for each letter in the Latin alphabet. In the initial configuration, you could use rotors in any order and at any starting position. In addition to the rotors, there was a reflector that would pass the signal back through the rotors in reverse. Finally, the last component was a plugboard. This plugboard had 10 pins that allowed you to map two letters together. This mapping switched the input letter to a new letter before even moving the signal through the rotors.
The following diagram, which I found on this site, shows it best.
Setting up the approach
Armed with an understanding of how the machine worked, I was ready to write code to simulate the Enigma. As is the pattern in my projects, I decided to compare the performance of two different solutions. First, I would build the engine and get it working in JavaScript. After that, I would build the same engine again in Rust. The expectation is that WASM+Rust would be faster than JavaScript.
Once I had the engines working, I wanted to build a web page to visualize the machine as best I could imagine. Since I could not get my hands on an Enigma machine, I wanted to at least visualize it because it seemed like a neat machine.
Building the first version
The original work to get a working machine in JavaScript was a bit more cumbersome than I had imagined. Getting all the specifications right without access to a device was difficult for me. Figuring out the relationship between the plugboard, rotors, and the reflector took me a while. Originally, I had forgotten that I had to “complete the circuit” and didn’t pass the transform back from the reflector and through the rotors. The good news is there was a wealth of information out there, and eventually I got something working. This whole process gave me a lot more empathy for anyone attempting to build Babbage's analytical engine.
A look at the types
Once I had this working, I had to figure out the correct configuration to pass to the machine. While I wrote this in JavaScript, the resulting TypeScript version would have looked something like this.
export type EngiamRotorConfiguration = {
    // The rotor type to use
    type: 'I' | 'II' | 'III' | 'IV' | 'V';
    // The ring the rotor is on
    ring: number;
    // The initial position of the rotor. This would be some letter A-Z
    position: string;
};

export type EngimaConfiguration = {
    // The reflector to use
    reflector: 'B' | 'C' | 'B Dünn' | 'C Dünn';
    // The rotor configuration
    rotors: EngimaRotorConfiguration[];
    /**
     * A mapping of plugs. This is expected to be two uppercase characters.
     * For example: 'BV' would map 'B' to 'V'.
     */
    plugboard: string[];
}

export interface IEnigma {
    // Setup the configuration of the engima machine
    configure(configuration: EnigmaConfiguration): void;
    // Restore the enigma machine to its originally defined configuration.
    reset();
    // Encrypt a message
    processMessage(message: string): string;
}
Idiosyncratic JavaScript
As I look back on this code, I noticed some interesting aspects. First, since I didn’t choose to write this in Typescript, I handled all the configuration edge cases via errors. An unexpected configuration provided to the configure method would result in an exception. This stuck out to me because I prefer control flows that do not throw. I suspect I did this so it could behave as a public API might. This is another classic example of overengineering for a prototype. I wouldn’t expect myself to use my own API incorrectly, and this extra work was entirely wasted.
In this case, it was clear that I used an object-oriented paradigm to build the machine. Engima was a class that used the Rotor and Plugboard classes to dispatch parts of the encryption to other components. However, I find it interesting that I didn’t make the reflector its own class. Instead, it was just a function in the Enigma class. The statefulness of classes was not needed for all aspects of this machine. For example, the plugboard was a simple transformation that could have been a helper function. Mixing paradigms here might not be the best solution, but it is clear I landed somewhere in between. Not everything needed to be class-based, and I could have used that mix more.
Now build it again in Rust
Now that I knew I could get the engine working and producing encrypted messages, it was time to write it in Rust. By this point, I had hardly written anything in Rust, and I was looking forward to the opportunity to go into battle with the compiler.
Beginner Rust problems
Looking back on this code, it is clear that I just took the JavaScript version, created some structs and traits, then attempted to recreate the program in a new language. As is often the case with ports of this nature, I noticed a handful of things I was doing that are out of place in Rust.
The first and most obvious to spot was the constant use of unwrap. Ideally, these should be handled instead of panicking. However, as I mentioned before, this was just for learning. So, is probably for the best that I didn’t spend too much time with the extra error handling, as this was not a production workload.
The second, and seemingly more egregious to me, is the complete lack of consistency in number precision. In the rotor code alone, I see the use of u8, usize, i32, and u32. All of these had been in the service of character codes. Ideally, I should have chosen a single number type and stuck to it, avoiding extra numeric casting and loss of precision.
The last and most expected was the inability to reason about the borrow checker. Instead, I invent solutions out of it. In this code, I saw many cases of Clone() when proper use of mutability or a pointer would have been more appropriate. I suspect this is the most common problem for new Rust developers, and it is no surprise I made the same error.
Building it again
Building this project is a bit different than other Rust projects. Instead of a basic compile-and-run, producing WASM-compatible output requires different compile steps. In order to do this, you need to add the wasm toolchain, wasm-bindgen, and compile using that toolchain instead of the default cargo build.
Remembering the correct series of commands to get this compiling again was a bit challenging. However, once I did, I was able to test the original page I wrote.
<html>
  <head>
    <meta content="text/html;charset=utf-8" http-equiv="Content-Type"/>
  </head>
  <body>
    <script src='./index.js'></script>
  </body>
</html>
const rust = import('./engima_wasm');
const config = {
reflector: 'B',
rotors: [
{rtype: 'I', ring: 0, position: 'A'},
{rtype: 'II', ring: 1, position: 'A'},
{rtype: 'III', ring: 2, position: 'A'}
],
plugboard: [
'AF',
'BE',
'CO',
'DP',
'GX',
'HY',
'IZ',
'JW',
'KT',
'LN',
'MR',
'QS',
'UV'
]
};
rust.then(m => {
console.log(m.process_message('HELLOWORLD', JSON.stringify(config)));
});Creating the Enigma web page
With the two engines ready, it was time to build a UI to visualize the Enigma machine and compare the outputs. This site uses a mix of technologies covered before, as well as one that hasn’t been used yet in this series. The usual suspects of SCSS, yarn, and WebPack are all present. However, in this case, the new one was preact. As this was the time of framework wars, preact was the new cool kid on the scene, making React faster by reducing asset size. Apparently, I had to get in on that.
Visualizing Engima
Since I had already built the engine, I had a sense of what the components should be. To structure this visualization, I created components for the keyboard, plugboard, and rotors as before. However, the net new component I needed to add was the lamp. To produce a replica of the machine, it was necessary to visualize the encrypted character via a lamp. Just an updated string at the bottom of the screen felt insufficient.
To visualize this correctly, I would have to update the rotor positions as you typed. A failure to do so wouldn’t feel quite right. After a bit of fiddling around, I got something working that would show the machine in motion while allowing you to set the initial configuration. In this visualization, you could either press a button or use the keyboard to start encrypting a message.
The power of proper abstraction
Once I had this all built out, I started to see an issue with the abstraction I created. While it solved the problem, the engine was built around sending an entire message at a time. However, this did not match the UX required. A single letter was sent at a time, building up the message incrementally. This is different than sending the whole message at once. While I was able to get this working, it did lead to a state management issue. I had the challenge of maintaining the configuration outside the engine while still updating the configuration on keypress. Since a key press would move the rotors, I had to ensure the logic was handled. In the case of the JavaScript engine, this was trivial, but Rust was a different story. In Rust, the memory boundary ended up being a problem. I couldn’t easily have Rust mutate the state of something managed by the JavaScript runtime.
This resulted in an insane harness around the Rust engine. This harness allowed the engine to work the same way the JavaScript engine did. While I was able to code around it, by the time I pitted it up against the JavaScript engine, it was orders of magnitude slower. This wrapper JavaScript code helps show just why it was so much slower.
sendMessage(message) {
    const config = this._transformConfig();

    return new Promise((resolve, reject) => {
        try {
            var start = performance.now()
            // Serialization boundary issue between runtimes
            let retVal = engine.process_message(String(message), JSON.stringify(config));

            this.originalMessage += message;
            this.encryptedMessage += retVal;
            this._timeTaken = performance.now() - start;

            // Required post processing of rotor positions
            this._updateRotorPositions(message.length);

            this.emit(this.messageProcessedEvent, retVal);
            resolve(retVal);
        } catch(err) {
            reject(err);
        }
    });
}
Notice all the extra work that was required here? On top of that, the performance measurement was skewed in favor of this approach, and it was still slower. See how we didn’t even include the time of the post message processing?
A point completely missed
I realize now that a trivial amount of planning would have shown that this performance comparison was silly. While an Enigma is a complex machine, the actual set of transformations required to encrypt one of these messages is quite trivial. Almost all work is simple addition or subtraction operations with number-to-string conversions. In the end, the most consequential performance characteristic was the runtime boundary. Passing messages between JavaScript and Rust is far more expensive than any transformation logic could have ever been. Taking a bit of time to consider this, I might not have attempted this specific project. However, in the process, I learned a great deal about Enigma and WASM.
By the time I realized this, I briefly considered recreating a Bombe prototype. This would have been a far larger amount of work than an Enigma prototype. In the end, I decided against taking that sort of time investment. Partially because there isn’t detailed information on how that machine worked, and partly because I didn’t want to spend a large amount of time learning another machine.
If any of this piqued your interest, I still have this prototype hosted here.
By now, we are almost caught up with my reflections on previous projects. There is only one more to write about to complete this series. Coming up, we will see familiar tools as well as some new commentary on their use.